Quilt Coats
The Before Times Exhibition: Wangaratta Art Gallery
12 Nov – 18 Dec 2022
I’m excited to have three of my bespoke quilt coats included in a new exhibition opening at the Wangaratta Art Gallery on 12th November.
THE BEFORE TIMES
A group exhibition featuring Phong Chi Lai, Tara Glastonbury, Caroline Hadley, Diana Vandeyar, Jessica Wheelahan and Lorena Uriarte.
The term before times dates back centuries and has a long association with imagined worlds and apocalyptic stories. Recently, the before times has taken on new significance as our lives changed dramatically and we fondly remember times before Covid-19.
Six artists have used this phrase as a starting point, some taking their practices back to basics or celebrating the return of inspiration and materials while others explore types of memory or envisage a dystopian future that might await us.
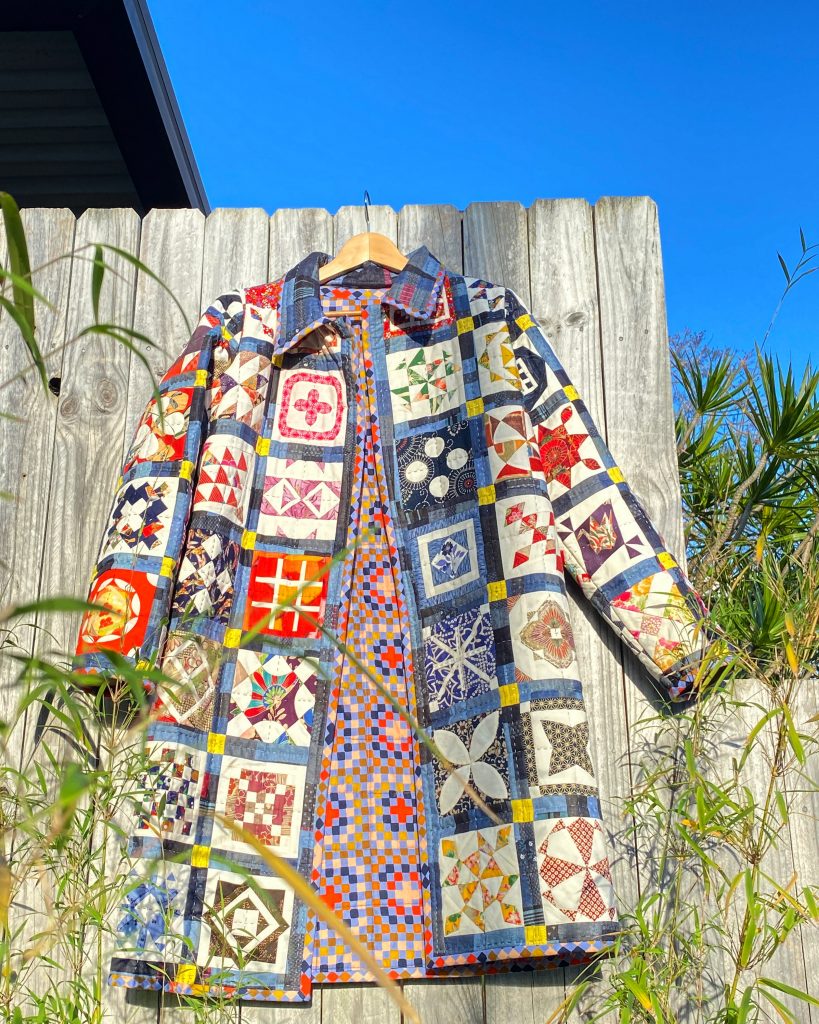

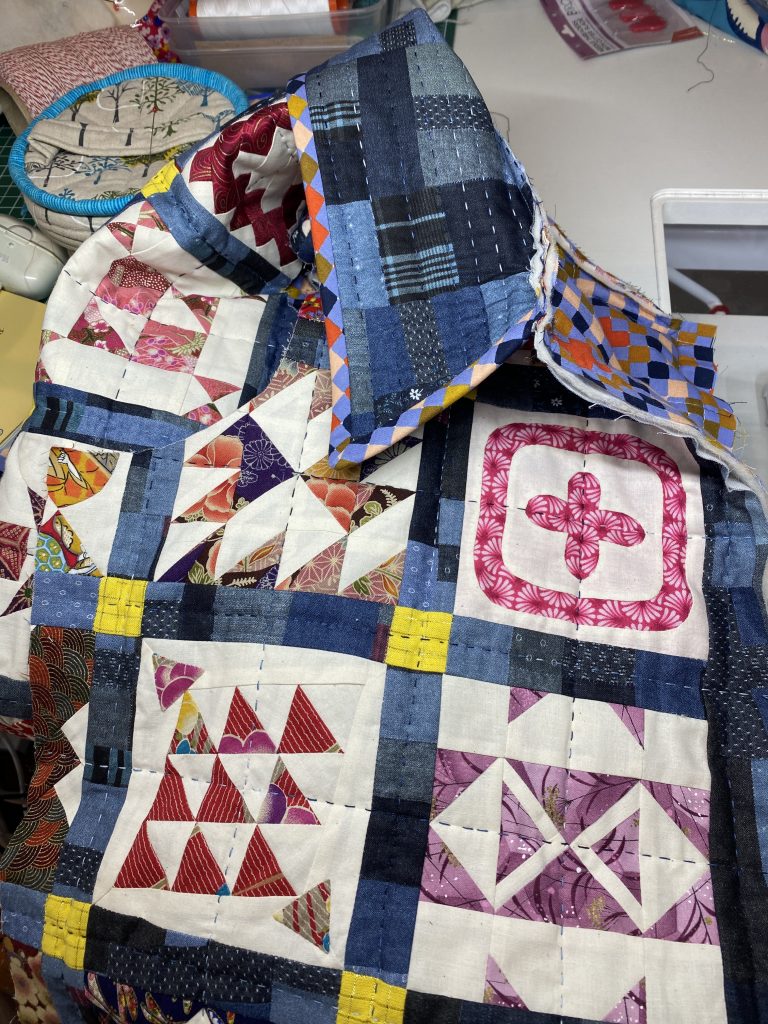

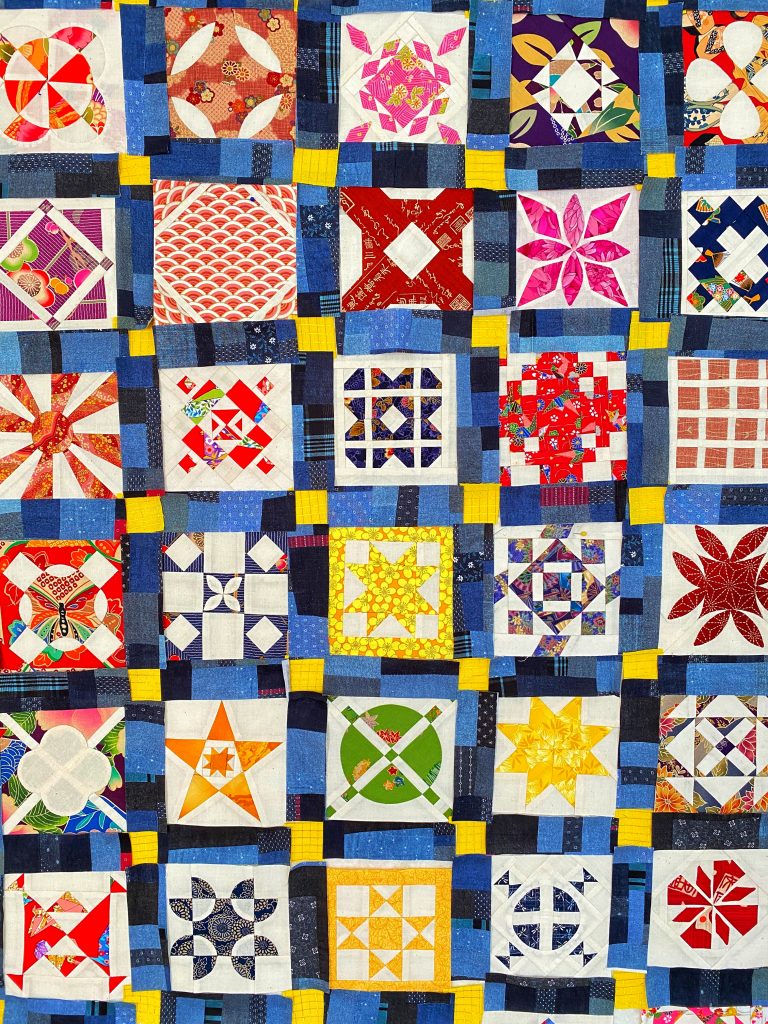


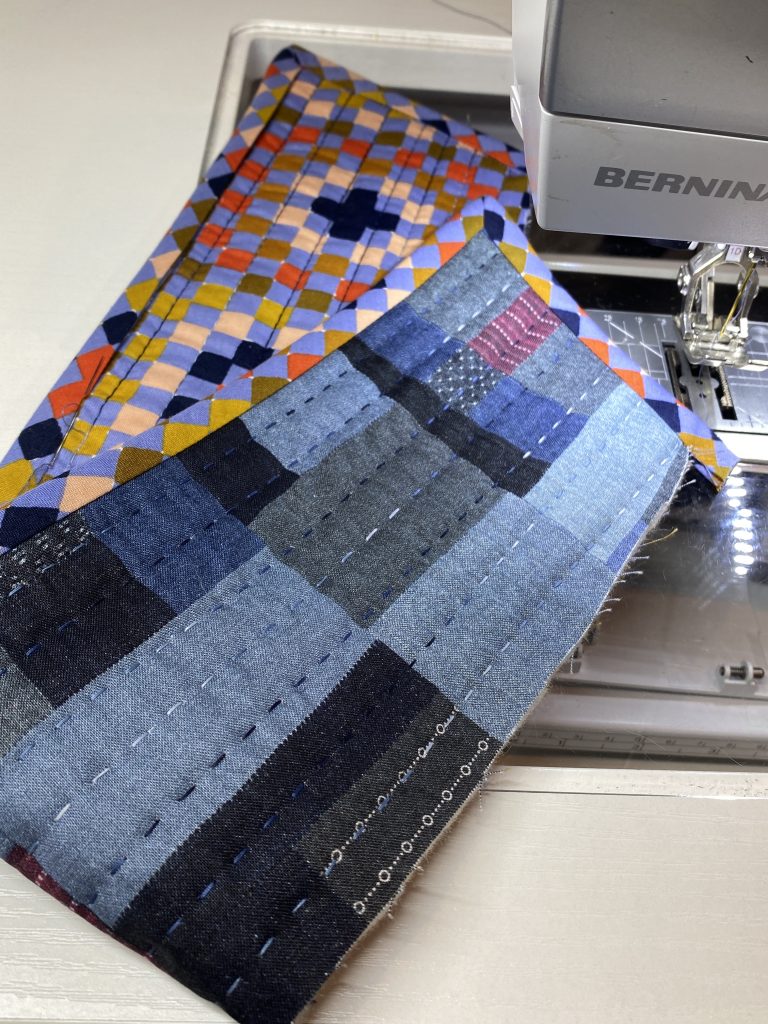

Number 1
Number 2

Number 3
Bushfire Charity Block drive for Wollongong MQG
Please see this post at Wollongong MQG Facebook group for more details.
I was asked to design an original block to share as inspiration. Please find the instructions below. This block is free for anyone to use for charity blocks and quilts. Please do the right thing 🙂
“How you can help:
We have decided to make tree blocks. The tree is a symbol of growth and nourishment. A tree symbolizes the generations of a family; a tree sprouts from a seed, the roots provide strength and stability, and whilst the new sapling is young and vulnerable they are protected by the other trees until they grow and flourish. In time the branches spread and then create new fruit that gives life to the next generation.
There is no restriction to one type of tree block. We would love our quilts to be beautiful and diverse just like our wonderful communities. The below quilt blocks have been designed and supplied for inspiration, but please feel free to use your own ideas and colours. If you would like to help, please make a tree block of a generous 12.5 inch square using a low volume / white or pale grey background. Once completed please send to:
Wollongong Modern Quilt Guild
PO Box 54
Jamberoo NSW 2533
We are going to distribute the quilts made to the families who have lost everything.
We would like to ask that blocks be mailed for arrival by the end of February. We thank you in advance for your support. #bushfireblocks
If you are going to be at Quiltcon, I’d be happy to collect your block there. Please get in touch to arrange a pick up. Thank you.

They called it “Diet Pie”…
Diet Pie
Auth: Lorena
Recipe type: Dessert
Prep time:
Cook time:
Total time:
Serves: 8
So named at quilt class, cause there are no calories whilst stitching, right?
Ingredients
- 3 medium granny smith apples, peeled, cored and cubed
- 2 tablespoons water
- ½ lemon, juiced
- 2 tablespoons sugar
- 2 tablespoons currants
- 1 teaspoon cinnamon, ground
- ¼ teaspoon cloves, ground
- 2 tablespoons walnuts, chopped
- 1 teaspoon plain flour
- 2 sheets puff pastry
- egg and milk wash
Instructions
- Simmer apple, water, lemon juice, sugar and currants for 5 minutes till apples are tender but still hold their shape. Watch they don't burn! Add a tablespoon of water if that looks likely!
- Remove from heat and stir in cinnamon, cloves, walnuts and flour.
- Cool completely.
- Cut pre-rolled pastry into two large circles. Use the biggest plate or bowl you can and a sharp knife.
- Place one circle on a sheet of baking paper on a flat baking tray.
- Top with apple filling, keeping 1" clear around the edge and press it level.
- Place the other circle on top and press the edges together till sealed.
- Using a small bowl, trace a faint circle in the centre.
- Then with a sharp knife cut out from the circle forming 16 slices.
- At this point you may need to chill the pastry again if it's a bit floppy before proceeding, place baking paper with tart/ pie on a plate into the fridge or freezer to firm up the pastry a bit. When cooled slide paper back onto baking tray
- Next, turn each slice on its side to expose the filling.
- Brush lightly with beaten egg and milk.
- Bake at 200C for 30 minutes till golden and puffed, if browning too quickly you may need to turn down your oven a bit.
- Allow to cool on a rack before serving.

They called it Diet Pie…

Sydney Quilt Show 2015

Wingdings: A Variety of Symbols by Lorena Uriarte. Inspired by the back side of Chuck Nohara’s Symbol Quilt.
Oops, it’s only when I saw my quilt in Quiltmania this week that I realised a massive oversight on my part. Seems I forgot to write about my most exciting quilty event of the year! The Quilters’ Guild of NSW’s annual Sydney Quilt Show, a member’s show with over 400 quilts in various categories and displays was on 17-21 June. It’s now months ago but it’s probably a good idea to document the event, especially since I won something and so did many of my friends.
There was a spectacular Red & White Challenge this year, over 140 Red & White quilts hung together in a brilliant display of ability and creativity. I had worked diligently to complete a quilt I’ve been wanting to make since 2012, a red & white version of Chuck Nohara’s Symbol Quilt. The original Symbol Quilt is double sided, with the red & white blocks on the back (see photo below).
My quilt really was an adventure, I’ve never made a two colour quilt before and I found it challenging. I was glad when it was finished and very grateful that Michele Turner was quilting it. I really needed a break from it. And it took months for me to pick a fabric for the binding. In the end I was really happy with how it looked and it won First Prize in the Machine quilted Category of the Red & White display. Hooray! Thank you to the sponsors Quiltsmith, Sew Easy, Tech2Home and Nestle for my amazing assortment of prizes.
Some photos of Windings: A Variety of Symbols. Not great ones. This may be why I haven’t written this post before!


I also entered a second quilt in the Modern Category, Under the Sea a variation of my Opal Essence quilt pattern. There’s an embarrassing amount of teal and aqua in my stash. This quilt documents much of it!

Like most of my quilts, they all end up in use or display around our home. Adding some colour to gloomy days or a warm wrap when it’s chilly!

More on the Sydney Show soon… in the meantime you can see all the prize winning quilts in The Quilters’ Guild of NSW Gallery.
my cheaty appliqué “thircles”
Yes, you read right. Thircles. You may already know that a squircle is the shape somewhere between a square and a circle but what’s a thircle?
If you’ve seen my Opal Essence quilt you’ll notice that all the circles are made up in thirds. The first quilt was made by appliquéing the third of a circle on to a diamond shape. A simple way to make sure you get a smooth circle is to use a template under your appliqué piece. The great thing about using this technique with a thircle (tee-hee, it still makes me giggle!) is that you can easily remove your template and reuse it.
My template of choice for this technique is a really smooth, bump free freezer paper template. You trace your pattern piece on to freezer paper and cut it out very carefully.
My cheaty applique thircle how to…
1. Press your freezer paper template to the wrong side of your fabric. As you will be folding the fabric over the template to appliqué try to place the curved edge on the diagonal grain. The stretch that lies here on the bias helps to create lovely soft curves with less bumps and folds.
2. If you are fussy cutting and placing the paper on the bias isn’t possible, consider using the fabric in a larger thircle. A larger, gentler curve is more forgiving with stiff fabric.
3. Next, use a ruler with a 1/4″ marking to add your seam allowance to the straight edges of your thircle shape. Cut with a rotary cutter or scissors. I love using an Add-A-Quarter ruler for this step. Using scissors cut a generous 1/4″ seam allowance around the curve.

4. Use a fabric glue stick to keep the seam allowance tucked under. Use a fine line of glue, about 1/8″ away from the curved edge of the freezer paper. That will help when it comes to sewing the shapes down and will also reduce the chance of your fabric fraying along the raw edge.

5. Match the seam allowance of your thircle with the corresponding point of your diamond background. Pin or lightly glue your shape into place. I like to pin along both seam allowances where there’s no freezer paper.

6. Using a thread colour that disappears appliqué the piece down. Use small stitches and pull the thread a little to hide it.
7. Once the shape is appliquéd down, trim away your background with scissors leaving a generous 1/4″ seam.
8. Finally, whip out your freezer paper template to reuse. The less glue you use, the easier it is to remove and reuse the papers.
Now that your thircles are appliquéd down, you can piece your diamonds into a hexagon and fan your centre seam.

I’ve been teaching workshops using this appliqué technique as well as the machine pieced thircles and most students are surprised by how much they enjoy the process. The smaller thircles are definitely less stressful if you appliqué them. The larger thircles can be rotary cut and machine pieced pretty quickly and painlessly. You can even mix both techniques in your quilt, maybe stick to one technique in each block though…
Hope that helps someone out there too afraid to try appliquéd curves. Let me know if you have any questions!
Modern Quilt Show Australia, Kiama
Long overdue blog post number 2 this week. As Miranda’s mum would say, “bear with”!
Topic: Modern Quilt Show Australia, hosted by Wollongong MQG in Kiama, 30th & 31st May.

Okay, right off the bat… I couldn’t attend this show as I’d absentmindedly booked myself out to teach in Brisbane this weekend. Rookie mistake. I will be making this show a priority in my schedule in the future as I heard so many wonderful things about it by those who did attend. Great vibe, exciting quilts, engaging discussions about where modern quilting stands today in Australia.
So, my only means of participating were by submitting two quilts for inclusion in the show. I have to congratulate the hardworking selection panel who picked the quilts to hang in this show, only the second time this event has been held. It’s a lot of work and not all the decisions are easy. From what I could see on social media that weekend and follow up blog posts, the show was a great success. Yay!
When I put my two quilts forward for inclusion they weren’t (ahem) actually finished, but I didn’t expect to have two accepted so I hedged my bets. I guessed which one would be accepted and started quilting that one. Then I received a notification that both were in and I frantically got to finishing them off. To put this in perspective I’d been busy finishing two quilts for the Sydney Show and wrangling together a GWSMQG group quilt entry too. In short, the house got very messy, and I probably wasn’t super social!

I was really happy with my finished quilts, Squircles was started at Quiltcon back in February in Carolyn Friedlander’s Aerial Grove class. I really, really loved making this quilt. I loved the freedom of not using a template or marking pen for the applique technique, I loved finding a variety of prints that would let the gorgeous Lecien yarn dye in the centre shine and I loved piecing the whole thing together like a jigsaw puzzle without referring to a pattern.
The improvisational quilting was a steep learning curve as I’d never tried portioning up a quilt top before and using a different pattern of straight line stitching in each section. It did break the job up and it made it less boring, which seems to be my main issue with quilting. It was still hard to wrangle though, 78″ x 78″ is not a huge quilt but it was still rather hefty to push through a domestic sewing machine. When I had finished both entries I treated myself to some hand quilting watching Carolyn’s Handwork Is Fun Webinar on the MQG website (members only). What a treat!

My second entry was a folly, a spur of the moment idea whilst scrolling through one of my favourite Instagram feeds “I Have This Thing With Floors”. I came upon an image of a tiled floor that I imagined I could make by simply using pre printed stripes. This was my fastest quilt top EVER, I’m working on a pattern for this quilt top so I’ll keep you informed…
I was thrilled to have both my quilts included in the Modern Quilt Show and so excited to hear that I Have This Thing With Floors got a Judges Commendation. Completely unexpected! Nothing for Squircles but it is now one of my favourite quilts! Here’s a list of all the winners.

I did have a hand in a few other winning quilts at the show: Our GWSMQG group quilt won 2nd place in the Group category, My daughter Sofia won 1st Place in the Youth category and another group quilt made with the fun gals I went to QuiltCon with earlier this year won 3rd place.
Thank you to all the organisers and sponsors of the Modern Quilt Show, it’s an exciting time to be a quilter and you are helping to get the word out there x
Phew, long post. One more to come this week. You have been warned…
Desert to Sea: 10 Quilts From Australian Designers

So many exciting things happening around here lately, I’ve fallen behind and so I’ll start with the release of my Opal Essence pattern in Jane Davidson’s fabulous book, Desert To Sea. The book was self published by my clever friend Jane and is available to order right now from Amazon and Book Depository. I know there are a few local fabric stores who are stocking it or taking pre orders too, in most cases this can be a slightly cheaper than paying for the book + overseas postage. Contact Quiltsmith, Material Obsession, Cotton Factory , Patches Indooroopilly and QuiltJane for more information.

Desert To Sea Book: 10 Quilts from Australian Designers
There are 9 other gorgeous quilts in the book by Jane Davidson, Danielle Auckens, Betty Kerr, Cathy Underhill, Charlotte Dumsney, Rachaeldaisy and Jeannette Bruce. The book has well written patterns, wonderful photography and even colouring pages to help you plan your quilt.
You may have seen some photos on Instagram taken whilst teaching this pattern, it’s proving to be a very enjoyable day class and students are learning lots. Take a look at the #opalessencequilt hashtag to be inspired! You’ll see photos of my two other versions of the quilt too #undertheseaquilt and #pinkchampagnequilt.

I’ve had acrylic templates made to help speed up the cutting for this pattern and will be listing sets in my shop next week. The acrylic templates set includes 6 pieces to help cut the diamonds and arcs for machine piecing, I’ll also include a full size A3 template sheet and a packet of pre cut freezer paper shapes to give the applique technique I teach in my classes a try. That will be for another blog post!
Template sets are $35 plus postage. I’m also getting 20 copies of the book to sell together with my templates for those who can’t find them locally. The set will be $70 plus postage.
Please contact me if you’d like to pre-order a set as I expect delivery in the first week of July.

UPCOMING EVENTS:
Social Tote Workshop at Material Obsession Saturday 27th June
Chuck Nohara Class at Material Obsession Friday 10th July
Chuck Nohara Class at Material Obsession Saturday 10th July
Lorena presenting at Friday Showcase at The Quilters’ Guild of NSW 7th August
Opal Essence Class at Quiltsmith 26th September
Opal Essence Class at Material Obsession Saturday 24th October
Apple, Pecan and Bourbon Caramel Cake
Apple, Pecan and Bourbon Caramel Cake
Auth: Lorena
Recipe type: Cake
Prep time:
Cook time:
Total time:
Serves: 12
It's healthy... it has fruit. and nuts!!
Ingredients
- 150 grams butter, softened
- ¾ cup caster sugar
- 1 teaspoon vanilla essence
- 3 eggs
- 2 cups self raising flour
- 1 pinch of salt
- ½ cup milk
- 2 granny smith apples, peeled, cored and sliced
- 1 cup pecans, chopped
- 50 grams butter
- ½ cup brown sugar
- ⅓ cup Bourbon
Instructions
- Cream butter, caster sugar and vanilla essence with a stand mixer or electric beaters.
- Add in 3 eggs, self raising flour, salt and milk. Mix on medium speed for 2 minutes till smooth and light.
- Spread cake batter into a greased springform pan/ cake tin with removable bottom.
- Arrange sliced apples over the top and sprinkle with chopped pecans.
- Bake at 180C/ 350F for 40 minutes till cake is cooked through and golden.
- Meanwhile, make caramel by simmering 50 grams butter, ½ cup brown sugar and ⅓ cup Bourbon till thickened. If you don’t have bourbon use scotch with a little maple syrup and vanilla to flavour it. Or leave it out but call it something else! You know the alcohol cooks out so no need to worry about getting tipsy?
- Anyway, when cake has cooled for 10 minutes, pour over warm caramel and let it sit till completely cool before serving.
- Or serve cake warm, with ice cream and hot caramel. Yum!

Emergency hex-it how to…
Well, there’s no point writing a QuiltCon post as you’ve probably read all about it and seen all the photos and besides the tragic and sad demise of my iPhone means I have no photos to share. C’est la vie. Move on Lorena…
So instead, I can finally focus on writing a tutorial to use my Emergency Hex-it kit that I gave to a few friends at QuiltCon. The kits included an acrylic template and seven 1″ hexagon papers, enough to make one hexagon flower. Maybe to keep in your handbag for crafty emergencies, just add fabric, needle and thread and voila – crisis averted!
It comes as a huge surprise that there are still some modern quilters out there who have never tried English paper piecing, oh hello Penny! Probably because I enjoy making samplers which aren’t always terribly modern, I learnt lots of different techniques to try to create all the different blocks.
Pairing up the technique of fussy cutting with English paper piecing can create a kaleidoscope of colour. Whilst it’s possible to machine piece fussy cut hexagons and other shapes, I like the portability of the paper pieced project. The acrylic template makes finding a motif and cutting the fabric super easy.
This tutorial will focus on making the hexie flower, I’ll follow this up with a tutorial to make the zipper pouch in case you can only sew one beautiful fussy cut hexie flower in your lifetime and want to share it with the world. Or you may become addicted and start a whole new quilt. For a grandchild. Mine is taking a while…
What will you need:
1″ Acrylic hexagon template with included 3/8″ seam allowance
7 1′ hexagon papers
fabric glue stick or needle and thread for tacking
strong, sharp needle
strong fine thread, a colour that blends into your fabric
cutting matt
small rotary cutter
a large piece of interesting fabric with at least 6 repeats of a motif (choosing fabric to fussy cut is an art itself, I should really write more about this)
Step 1
Spread out your fabric and slide the template around till you find a motif that you like and that you can see would repeat well. It doesn’t necessarily need to be completely symmetrical but that can help create the kaleidoscope effect. Check that you have six of the motifs on your piece of fabric before you start cutting!

Step 2
Using a small rotary cutter, carefully cut around the template. Be careful not to shift the template and cut as accurately as possible.
You will use this first cut hexagon to position the template for the following 5 identical pieces.

Step 3
Position your template carefully over your hexagon and cut with your small rotary cutter.
Repeat till you have 6 identical hexagons.

Step 4
Here comes the fun part, where you start to see your pattern emerge.
Take one of the fabric hexies, flip it over and place under the template.
Dab a tiny amount of glue in the middle. This will hold the paper template in place.

Step 5
Centre the paper hexagon into the middle of the acrylic template.
Remove the acrylic template and repeat with the rest of your fabric hexies.

Step 6
I prefer to use a glue stick to fold back my seam allowance.
You could also tack them down with needle and thread but I find I get better accuracy with the glue stick.
Use a thin line of glue at least 1/4″ from the edge of the paper. You don’t want to get glue where the needle and thread need to push through.
Fold over the seams one by one, creating neat folds in the corners.
Don’t pull the fabric too tight, you need a tiny gap at the edges to get your needle through later.
Don’t use too much glue! Those papers need to come out at the end.
Repeat with all six hexagons.

Step 7
You’ll need an extra hexagon for the centre, that one needn’t be fussy cut so go ahead and pick a fabric that compliments your design. Then play around with your hexies to find a setting you like. It’s amazing how different they will look as you turn them.
I decided to go with the blue solid.
See that film that I’ve got under my hexie? I’m trying a tip from QuirkyGranolaGirl Melinda, it’s Press’n Seal and it keeps my pieces from disappearing in a gust of wind. High novelty factor as we don’t have this stuff in Australia! Probably a piece of batting will work just as well.
Anyway, time to stitch. I prefer to sew all the “petals” to the centre of the flower first but feel free to do what feels good for you.
Place your two prepared hexies together, make sure you’ve got the right edges together.
Use fine, strong thread and a strong, sharp needle to make little whipstitches over the edges of the templates. Don’t sew through the paper, there should be just enough fabric over the edges to slide your needle through. If not you may have glued your fabric too tightly or used too much glue.
Continue sewing the petals around your central hexie.
Always knot at the corners in case of thread breakage.

Step 8
Continue sewing the hexies together by folding the flower in half and sewing the opposite seams till you’ve sewn all the seams.
You can see the folds here:

Step 9
And voila! your beautiful fussy cut hexie flower is done.
See that wasn’t too hard at all. And don’t worry if it’s not perfect. The eye and brain work very well to forgive imperfection! And if not, take your glasses off or step back.
Next I’ll give you some tips on what you can do with one flower or maybe you want to make a whole quilt full of them?
Will you make one? I’d love to see it. If you share it on IG or Flickr please tag me or #emergencyhexit 🙂
