Lorena Uriarte

Quilts, cooking and craft

  • Home
  • Quilt Gallery
  • Classes and Workshops
  • Recipes
  • Shop
  • Lorena’s Blog
  • Contact Lorena
You are here: Home / Archives for zipper pouch

Retreat Bag : UsefulBox Sewing School (Marrickville)

1 February, 2025 by admin

Quilted Retreat Bag Workshop with Lorena Uriarte
Skill Level: Basic Knowledge of Machine Sewing

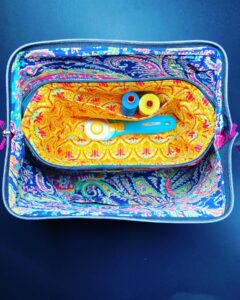
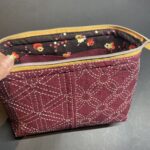
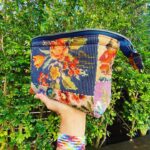
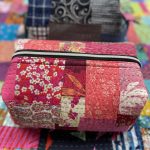
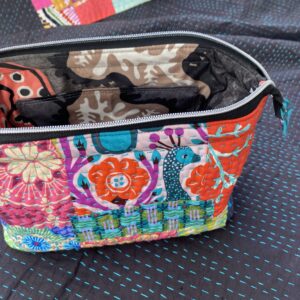
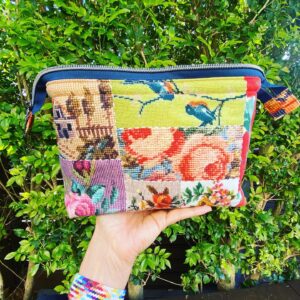
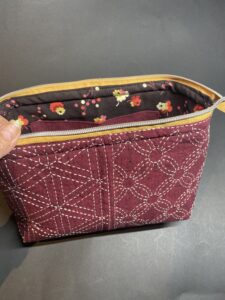
Join Lorena Uriarte, a renowned Modern Quilter, to make this charming zip pouch featuring your own quilted panels. Perfect for gifting or treating yourself, the Emmaline Retreat Bag is a clever design by @emmalinebags, featuring special hardware that allows the bag to open wide for easy access to your items.

What You’ll Learn:

  • Inserting a zipper
  • Creating boxed corners
  • Basic bag construction

Use up your scraps for a Kawandi-inspired exterior, or incorporate Boro, Sashiko, or other quilted panels. Have some orphaned patchwork blocks or a special piece of fabric? They’ll work beautifully for this pouch! To make the large version, you’ll need two pieces of fabric at least 18.5” x 12” each.

Special Offer:
You can take Lorena’s Kawandi class on 9 February and bring your finished piece to use for your Retreat Bag! Book both classes and get $25 off—details provided when you book the Kawandi class first.

What’s Included:

  • Expert tuition with Lorena and 6 other students
  • Unlimited tea, coffee, and maybe a special treat from Lorena herself

What to Bring:

  • Your sewing machine (don’t forget the foot pedal and power cord)
  • Two pieces of outer fabric (at least 18.5” x 12” each)
  • Two pieces of inner fabric (at least 18.5” x 12” each)
  • Glasses, if needed
  • Lunch—microwave, sandwich press, and fridge available, or explore the local cafes

Kits:

  • Small kit: $45
  • Large kit: $55
    Kits with interfacing and frames must be ordered when booking your spot.

Dates Available:

  • Sunday, 23 March, 10 am to 3 pm

Sign up now for a fun and creative day of bag-making!

Tagged With: emmaline retreat bag, kawandi bag, retreat, zipper pouch

Retreat Bag Day @GJ’s Melbourne

5 June, 2023 by admin


Kawandi Retreat Bag Workshop

Yes, I’ll be back at GJ’s to finish what we started in February!

Book your spot in this one day workshop, with the usual delicious treats and plenty of tea and coffee to keep you focused.

10am to 3pm gives you plenty of time for retail therapy before and after class too.

Need a hardware or kawandi kit? Pre order for delivery at the workshop.

I look forward to seeing you again Melbourne x

PS I’m in Melbourne for the local launch of the In Conversation exhibition. Stay tuned for more details!

Order Kits here:

Retreat Bag Kit for Students ONLY

Tagged With: bag making, emmaline retreat bag, kawandi bag, sewing day, zipper pouch

Flat zippy pouch

1 February, 2015 by admin 3 Comments

I added a flat zipper pouch to my #quiltcon2015lanyardswap as I reckon they’re handy to pop in cards and supplies. I don’t make these often enough so I’m writing the process down for later reference. No use reinventing the wheel every time I want to take the car for a spin! (null)

Ingredients:

1 zipper ( for a 6″ pouch I use an 8″ zip)

2 3.5″ x 7″ rectangle of pieced or plain outer fabric

2 3.5″ x 7″ rectangles lining fabric

2 2.5″ squares of fabric for zipper tabs

1 2.5″ x 4″ piece of fabric for split ring loop

1 split ring

Method

1. Prepare zip: fold fabric tabs in half and stitch to cover the zipper ends so that zipper + tabs extend to 7″. Trim excess zipper with strong scissors. Be careful with the metal clip!

2. Layer one outer piece, right side facing up, place prepared zipper face down lining up the top edge. Pull the zipper tab all the way to the top.

3. Top with the lining piece right side down. Pin it together. It should look like a zipper sandwich!

4. Using a zipper foot, stitch along the zipper edge keeping a nice straight seam. When you are half way down, leave the needle down and lift the presser foot. Slide the zipper pull out of the way before finishing the seam. The closer to the zipper you stitch, the less zipper colour will pop through.

5. Repeat with the second side of the zipper, layering outer fabric facing up, prepared zipper facing down and lining fabric facing down. Pin and stitch as before.

6. Open out and press outer and lining fabric away from the zipper. Topstitch either side of the zipper to keep lining out of the zipper teeth. Next you will need to stitch the bottom of the outer and lining separately forming a loop either side of the zip.

7. So, bring the long edge of the outer fabrics together RST (right sides together) above the zip and stitch using a 1/4″ seam.

8. Repeat for the lining but bring them to meet below the zip and stitch leaving a 3″ gap in the middle.

9. Open the zip to the middle! (Or you will need to do some unpicking later) Next you will need to stitch the top and bottom sides closed, attaching the split ring loop to the top.

10. Bring the zipper to the middle, aligning the outer and lining fabrics with the centre of the zip.

11. Stitch across the top, taking care to stitch slowly through the bulky seam.

12. Take the 2.5″ x 4″ piece of fabric and fold in thirds in to a skinny long piece and then in half creating a loop. Press well.

13. Insert the loop into the remaining edge, the top. Raw edges should be sticking out. Line it up with the centre of the zip. Stitch across carefully as the seam is bulky. Trim any excess fabric from the loop. Now turn it all the right way:

14. Reach through the 3″ gap in the lining and pull all the fabric through, reach through the open zipper and continue to pull the outer fabric through.

15. Poke your fingers into the corners and smooth out the lining inside. Smooth the outer and press well.

16. Using a ladder stitch or a small machine straight stitch in matching thread, close the 3″ gap. Flat Zippy Pouch 2

Give it another press and voila! Your flat zipper pouch is ready to enjoy. Or gift! PS See that cute Dollar Bill Origami Shirt? You can make one too following these instructions. I haven’t made these in years. Not much fun now that our notes are all made of plastic!

Filed Under: Front page, Tutorials, Uncategorized Tagged With: flat zipper pouch, QuiltCon, swaps, tutorials, zipper pouch

  • Email
  • Facebook
  • Flickr
  • Instagram
  • RSS

Lorena Uriarte

Lorena Uriarte

Subscribe to My Newsletter

GET MORE UPDATES!

Sign up to get exclusive updates & tips!

Check your inbox or spam folder to confirm your subscription.

MQG Member

I’m a member of the MQG!

The Splendid Sampler

The Splendid Sampler

Categories

  • 12 inch sampler
  • Bee Blocks
  • Chuck Nohara
  • Comfort Foods
  • Cookies
  • Desserts
  • English paper piecing
  • Everyday Meals
  • Foundation Paper Piecing
  • Front page
  • Fussy Cutting
  • Lorena Uriarte
  • Lorena's patterns
  • Quilts
  • Recipes
  • Red & White
  • Sydney MQG
  • The Splendid Sampler
  • Treats
  • Tutorials
  • Uncategorized
  • Vegetarian Dishes
  • Workshops

Upcoming Events

Notice
There are no upcoming events.
  • Facebook
  • Instagram
  • Pinterest
  • RSS
  • Twitter
  • Shop
  • Shipping and returns

c. 2015 Lorena Uriarte

Copyright © 2025 · Foodie Pro Theme by Shay Bocks · Built on the Genesis Framework · Powered by WordPress